NSOiO[译]绘制中间镂空的图形的方法 2014-02-04
在这篇文章中,我研究了5种不同的方法去绘制这样一种简单的形状:一个正方形,中间是一个三角形。在一个绘图环境,比如CoreGraphics中,提供了double buffering, winding count path filling, even-odd path filling 和 clipping regions等不止一种方法。最后还将提供一个iPhone的示例工程,里面的绘图代码同样适用于Mac。
介绍
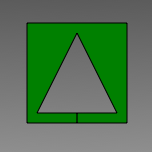
这篇文章将要研究绘制下面这个图形的不同方法:

这是个简单的形状,但是需要一个不简单的拓扑:为了绘制它,你需要在图形外面裁剪出中心。这篇文章将要研究5种不同的实现方法,并分析各自的优缺点。
为了更好的说明,我把绘制过程种需要用到的点的坐标都起了如下的名字:
1 | // Coordinates are: |
方法一 overpainting
最无脑的绘制过程是先使用图形的颜色绘制出一个正方形(ABCD),然后在此之上用背景的颜色绘制出一个三角形(EGF)。
虽然很清楚,但是这样的代码是不被建议使用的。
1 | // Technique 1: overpaint |
Advantages: if you’re only familiar with the “painter’s algorithm” (everything is just painted over the top of everything else) then this might be the easiest concept to understand.
Disadvantages: if your background changes, the effect won’t work.
优点:
如果你仅仅熟悉`painter algorithm`,认为所有的绘制过程都是一层一层绘制上去的,那么这或许是你能够理解的最简单的方式。
缺点:
如果背景颜色改变了,将不会对镂空部分起作用。

这种绘制过程还有个问题就是图像中三角形的像素部分会在’offscreen buffer’中绘制两次(第一次使用正方形的颜色,第二次使用背景颜色)。如果你用这种方法去绘制一个很大的图形,这将会比只绘制一次慢很多。
方法二 false hole
绘制这个图形的另一个欺骗的方法是将其看作一个单一的拓扑,沿着H-I这条线裁剪,像绘制马蹄铁一样去绘制这个图形(ABCI 然后 HGEFH 最后以 IDA 结束)。
再一次,下面的代码还是不建议使用。
1 | // Technique 2: false hole |
优点:
避免了方法一中,背景颜色改变而导致的颜色不一致的问题
优点:
绘制不太准确,因为会多出一条边界出来。
这个过程会有精确性的问题:如果底部的两次裁剪不能重合,在高分辨率下会显示一条缝隙(比如在Mac下一旦分辨率依赖于用户的设置,对象的绘制就会导致不期望的尺寸)
方法三 Winding count
这是在绘制镂空的图形中第一种正确的方法,使用Winding Count多边形内部运算法则来确定内部的三角形是在绘制路径的外面。
Winding Count是CoreGraphics用来确定一个像素是在绘制路径内还是在绘制路径外的默认方法,它的工作过程如下:
- CoreGraphics draws every horizontal row within the path’s bounding rectangle from left-to-right
- At the start of each row, CoreGraphics sets the winding count for the shape to zero.
- If CoreGraphics crosses a line in the shape at any point during the row, it notes if the line was going upwards or downwards at the point where CoreGraphics crossed it.
- An upward line increases the winding count of the shape by 1.
- A downward line decreases the winding count of the shape by 1.
- If the winding count for the shape is ever non-zero (positive or negative) then pixels are filled according to the color of the shape.
如果上面的不好理解的话,下面的是简单的描述:
简单的winding count:
如果路径是顺时针的,则内部的逆时针路径将不会被绘制;如果路径是逆时针的,则内部的顺时针路径将不会被绘制。
使用Windging Count绘制图形的代码如下:
1 | // Technique 3: winding count fill rule |
子路径 ABCD 是顺时针的,所以逆时针的 EFG 就创建了一个洞。为了开始内部的子路径,我们需要关闭第一条子路径,并把当前点移到下一条子路径的起始位置(所有的子路径都是当前路径的一部分)
优点:
确实是绘制了一个裁剪了一个洞的图形。
缺点:
使用时必须需要小心一点,如果不小心将内部的子路径顺序改为 EGF ,它将不会工作(顺时针加上顺时针导致winding count等于2,非零会被填充)
Winding counts 需要一点额外的注意力去保证方向一直要保持一致。
方法四 Even-odd paths
Even-odd是用于CoreGraphins的另一套规则,相比较winding count它更简单一点:在even-odd中,最外层的边界开启一个填充路径,次外层的边界会关闭这个路径,其他的嵌套边界也是一样。
实现代码和winding count版本很类似,区别就在于我们要用CGContextEOFillPath来填充路径,而且不必考虑ABCD和EFG的次序问题。
1 | // Technique 4: even-odd fill rule |
优点:
和`winding count`相比,避免了次序出错的可能性。
缺点:
有些情况下,`widning count`会给出更好的结果。看一下下面由单条连续路径12345绘制而成的五角星
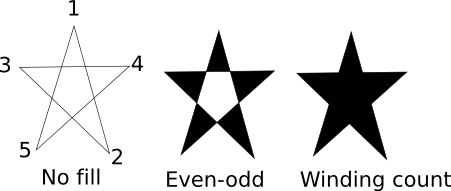
在这种情况下,如果你确实想填充中间部分,你就得使用winding count(图形是由连续的顺时钟方向路径所绘制的,所以winding count一直都是正的)
方法五:Clipping region
最后一个方法是使用clipping region来使能绘制区域,进而去掉中间的三角形。
1 | // Technique 5: remove the inner hole using a clipping region |
可以看到,这个方法确实相当复杂,因为要绘制的图形上有镂空,所以clipping region也要做相同的事情。我是用even-odd规则在clipping region的矩形边界减去三角形。
优点:
一个裁剪区域能够非常简单的减去或切除掉非常复杂的图形簇
缺点:
像上面这样如果要切除一个简单的图形,需要做些额外的事情:保存/恢复旧的状态,再加上裁剪区域仅仅和图形本身一样负责,使得这个方法比前两个需要做更多的事情。
总结
可以直接下载代码GraphicalSubtraction.zip(25kb),或者直接从github上下载
一个非常简单的图形,但是你可以用很多不同的方法。就像你所看到的,解决这个问题的错误的方法确实不能节省代码量 - 和正确的解决方法差不多
解决这个问题最好的方法是使用even-odd或者winding count。因为图形看起来像是中心被裁剪掉,clipping region被证明是需要更多的工作,而且非矩形的裁剪确实不大好计算。